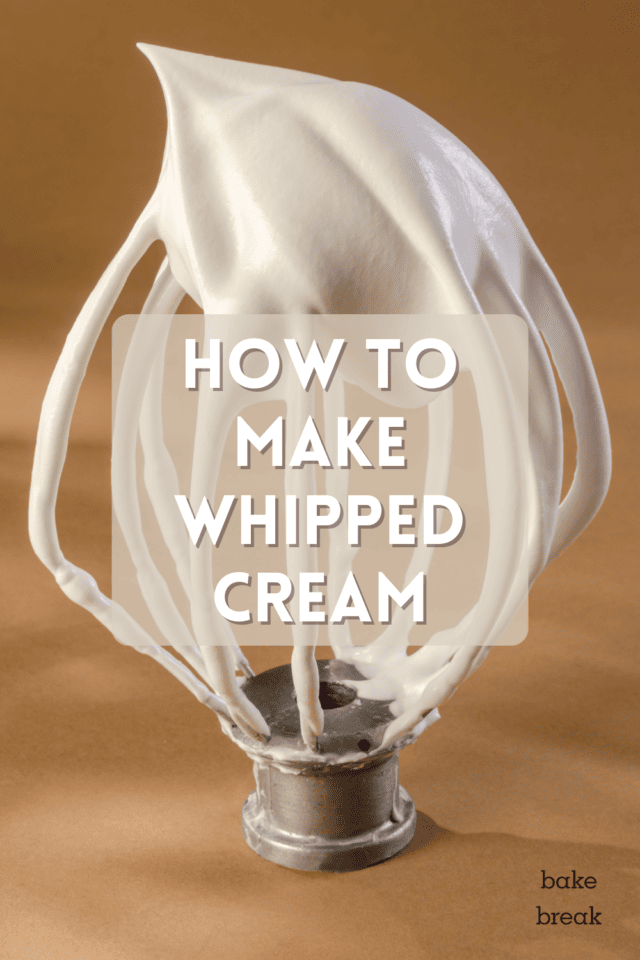
Learn how to make whipped cream, and you’ll never want store-bought again! It’s a perfect dessert topping and an important part of many dessert recipes!

Homemade Whipped Cream
I firmly believe that once you’ve made homemade whipped cream, there’s no going back to store-bought. Not only is it so much tastier, but it’s also ridiculously easy to make.
There are few things that are as simple and versatile as whipped cream. Use a dollop to top off a dessert, mix it with fruit, use it for a simple cake frosting, or incorporate it into a pie filling.
No matter how you use it, I think you’ll be enamored with it from your very first bite!
What You’ll Need
Scroll down to the recipe card to find the ingredient quantities and recipe instructions.
- Cream – Use either heavy cream or heavy whipping cream for best results.
- Confectioners’ sugar – This is also called powdered sugar. I find that it works best for making sweetened whipped cream as it acts as a stabilizer. Alternatively, you can use granulated sugar.
- Flavor additions (optional) – See below for some ideas for adding flavor to your whipped cream.
What Kind of Cream to Use for Whipped Cream
Choosing the cream for your homemade whipped cream is all about the fat content. As a general rule, you can use heavy cream, heavy whipping cream, or whipping cream. However, those don’t all have the same milk fat content, so you’ll get different results.
A milk fat content of at least 30% is best. Light cream, half-and-half, and other products with low milk fat contents just won’t work nearly as well or sometimes not work at all.
In particular, whipping cream (without the word “heavy” in front of it) has less milk fat (about 30%) content and will make a softer, lighter whipped cream.
My preference is to use heavy cream or heavy whipping cream for this whipped cream recipe, which both have about 36% milk fat. They tend to whip into a thicker, sturdier whipped cream that just seems to work better in my opinion.
How to Make Whipped Cream


- Start whipping. Place the cream in a large, chilled mixing bowl. Use an electric hand mixer or stand mixer with a whisk attachment to beat the cream until it begins to thicken. Start at low speed and work up to high speed over a minute or so.
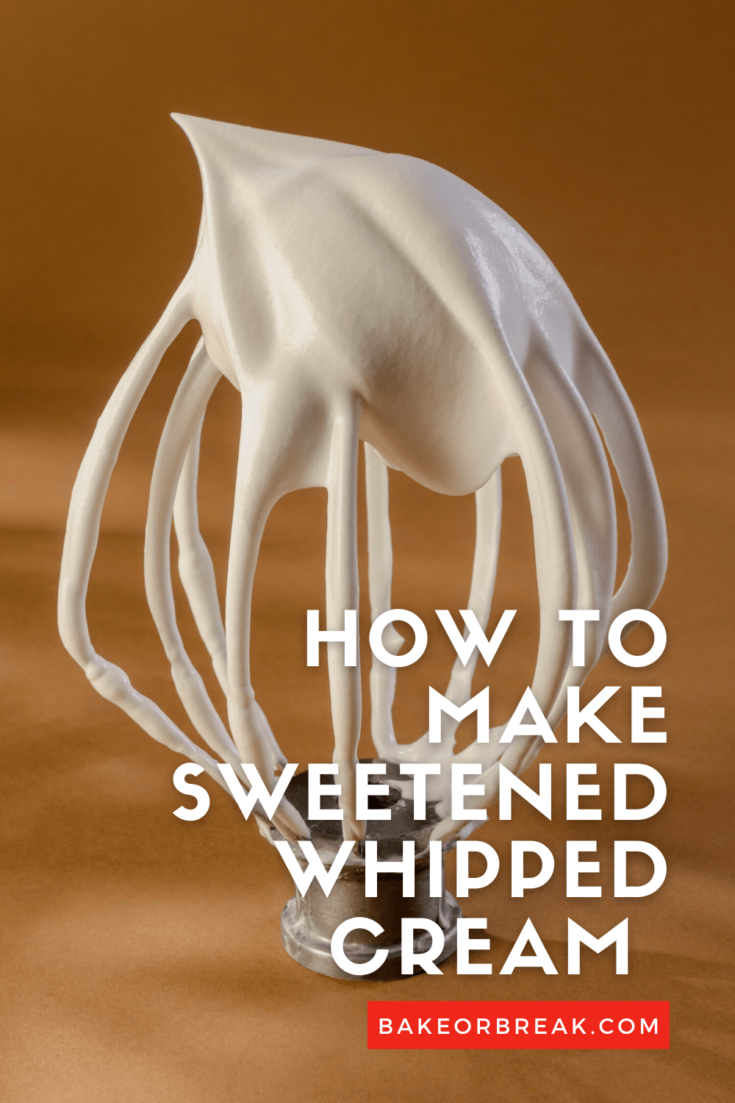
- Add the sugar. For sweetened whipped cream, sprinkle the sugar over the partially thickened cream. Continue whisking until combined.
- Add more flavor. If you’re adding vanilla or any other flavors, mix those into the cream.
- Finish whipping. Continue mixing until the cream reaches the desired consistency.
Soft Peaks, Medium Peaks, Stiff Peaks


You’ve likely seen reference to whipping until a certain kind of peak is reached. This is not as complicated as you might think. If you’re whipping cream for a recipe, it should tell you what type of peak you’ll want. If you’re making whipped cream for a topping, you’ll usually want either medium peaks or stiff peaks.
- Soft peaks. When the whisk is lifted out of the cream, the cream should fold over.
- Medium peaks. For medium peaks, the tip of the peak should curve slightly downward.
- Stiff peaks. The peak will remain pointing straight up once you’ve reached stiff peaks. If you continue mixing, the cream will become grainy and look curdled.

Tips for Making Whipped Cream
Making this whipped cream recipe is so very easy, but here are a few tips to make sure yours is just right!
Keep Everything Cold
It may seem obvious, but make sure your cream is cold before whipping it. I wait to take it out of the refrigerator until I’m ready to use it.
While it’s not a requirement, I like to place the bowl and whisk attachment in the refrigerator for 20-60 minutes before I plan to make whipped cream. You want to keep the cream cold while you whip it. If you have a warm kitchen, a cold bowl and whisk will be your friends.
The Bowl Makes a Difference
It is often recommended to use a metal bowl for whipping cream. That’s because it will stay colder longer than a bowl made of another material. If you have a warm kitchen, this is certainly something worth considering.
Make sure your mixing bowl is deep so you don’t make a mess when you start whisking. Start mixing on a lower speed and ramp up to high speed as you continue mixing to minimize splatter.
Keep in mind that whipping the cream will essentially double the volume of it. So, if you need 2 cups of whipped cream, start with 1 cup of heavy cream. The recipe below yields 2 cups of whipped cream. If you need more or less, simply scale the recipe (including the sugar if using) to the amount of cream you’re whipping.
Use an Electric Mixer
While you can certainly use a whisk to make whipped cream by hand, I always go for my handheld mixer or stand mixer. It’s much quicker and less taxing.
For sweetened whipped cream, you can use either granulated sugar or confectioners’ sugar. I have used both, and I prefer confectioners’ sugar. Confectioners’ sugar makes a more stable whipping cream, due to the starch in it. That makes it a good choice if you’re not using the whipped cream immediately.
How to Store Whipped Cream
This whipped cream recipe is at its best when it’s freshly made, but you can store it short-term. Place it in an airtight container and refrigerate. Keep the container toward the back of the refrigerator where it’s colder. It should keep for a day or so.
How to Freeze Whipped Cream
Did you know that leftover whipped cream can be frozen? Scoop or pipe it onto a parchment-lined baking sheet, and place it in the freezer until the portions are frozen solid. You can even leave it overnight.
After the portions are fully frozen, transfer them from the parchment paper to a freezer-safe container. They should keep in the freezer up to a month. It will thaw fairly quickly, so you can usually just take it from the freezer and place it directly on top of your treats as a garnish.
Ideas for Flavor Add-Ins
Try different flavors in this whipped cream recipe! Start with a small amount and adjust to your tastes. Remember you can always add more, but you can’t take away what’s already been added.
- Vanilla – I often add either vanilla extract or vanilla bean paste.
- Other extracts – Try almond, coconut, peppermint, or another of your favorites!
- Cocoa powder – You can use either natural or Dutch process cocoa powder. Try about 2 tablespoons of cocoa per cup of cream and add more if you like.
- Honey – Instead of sugar, try adding about 1 tablespoon of honey per cup of cream.
- Lemon juice – For every cup of cream you’re whipping, add 2 to 3 teaspoons of lemon juice along with a tablespoon of lemon zest.
- Dulce de leche or caramel – Add 2 or 3 tablespoons per cup of cream. (See my Dulce de Leche Cheesecake.)
- Cinnamon – Start with 1/4 to 1/2 teaspoon per 1 cup of cream and go from there.
- Peanut butter – Add 2 tablespoons of creamy peanut butter per cup of cream. My Chocolate Peanut Butter Icebox Cake has both peanut butter and chocolate whipped creams!
- Liqueur – Irish cream, Kahlua, Amaretto… so many options! The amount you’ll need will vary, so start with a tablespoon per cup of cream and adjust as needed.
- Fruit jam – Try adding 2 or 3 tablespoons of your favorite jam. See an apricot version in action in my Brown Butter Almond Cake.
How to Use Whipped Cream
Oh, the possibilities are endless! I love to add a dollop of sweetened whipped cream on top of so many desserts. In fact, I usually prefer it to ice cream for topping cakes, fruit crisps, and pies.
You’ll also find that whipped cream (often without the sugar) is a component in a lot of chilled pies, no-churn ice creams, and no-bake cheesecakes.
This sweetened whipped cream recipe can also be used as a simple frosting for cakes like Lemon-Strawberry Shortcake Cake and cheesecakes like my Spiced Cheesecake. I think you’ll find that it’s wonderfully versatile!
Frequently Asked Questions
If your cream isn’t whipping, you may not have whipped it long enough. If you feel that’s not the issue, then it may have become too warm. Put the bowl in the refrigerator for a few minutes and then try again.
It can be easy to over-whip cream. If you’ve over-whipped your whipped cream just a bit, try pouring in a small amount of cream and folding it into the whipped cream. That will likely get you back on track, but it’s also possible that it’s not salvageable at this point. Of course, if you keep whipping, you’ll end up with butter. While I don’t think you’re likely to let things get that far, just know that if it starts looking grainy and a little greasy, you’re on your way to butter.
Adjust the sweetness to your taste. I adjust the amount of sugar depending on how I’m going to use the whipped cream. If it’s going to top off something that’s already pretty sweet, then I dial it down a bit. The best way to know if your whipped cream is appropriately sweetened is to taste it. Now, there’s the perfect excuse to swipe a bit off the whisk and give it a try!
In most cases, the whipped cream should be used as soon as it’s made, although it should keep well for a few hours or even a day or so, especially if it’s made with confectioners’ sugar. Just keep in mind that it will break down over time. If you aren’t using it immediately, cover it and refrigerate.
More Baking Basics
- How to Make Vanilla Extract
- Tips for Baking Muffins
- Types of Salt: A Home Baker’s Guide
- How to Make a Christmas Cookie Tray
- Bundt Cake Baking Tips
Whipped Cream
Once you've mastered homemade whipped cream, you'll never use store-bought again!
Ingredients
- 1 cup cream*
- 2-3 tablespoons confectioners' sugar or granulated sugar**
- 1/2 to 1 teaspoon vanilla extract (optional)
Instructions
- Place the cream in a large, cold mixing bowl. Using an electric mixer with a whisk attachment, beat the cream until it begins to thicken. Start at medium-low speed and work your way up to high speed over a minute or so to minimize splatters.
- Sprinkle the desired amount of sugar over the cream. Continue whisking until combined. Add the vanilla, if using.
- Continue beating until you achieve the desired consistency. For soft peaks, the cream should fold over when the whisk is lifted out of the cream. For medium peaks, the tip of the peak should curve downward. For stiff peaks, the peak should remain straight up.
Notes
*You can use heavy cream, heavy whipping cream, or whipping cream. My preference is to use heavy cream or heavy whipping cream, as they tend to hold up better when whipped.
**Confectioners' sugar will make a more stable whipped cream.
Recommended Products
Bake or Break is a participant in the Amazon Services LLC Associates Program, an affiliate advertising program designed to provide a means for us to earn fees by linking to Amazon.com and affiliated sites.
Bake or Break is a participant in the Amazon Services LLC Associates Program, an affiliate advertising program designed to provide a means for us to earn fees by linking to Amazon.com and affiliated sites.


7 Comments on “How to Make Whipped Cream”
LOOOOVE making whipped cream!
My mom always used to make homemade whipped cream as “icing” for our birthday cakes so it has a certain nostalgia for me. Love it!
I love making whipped cream. There really is no comparison!
I don’t have a whisk attachment, can I use a regular beater attachment that comes with my kitchenaid?
Megan, it works much better with a whisk attachment, but you should be able to make it with the regular beaters.
I enjoy reading your articles!. They are very informative and I always learn something new. You have helped me become a better baker. Love you recipes too!
Thank you so much, Pamela! I’m so glad you find them helpful.